Sunday, 26 June 2016

Department Based Login Using ADF Security And Custom login

Helo Everyone 

Today i will discuss how to create User Based Login Using ADF Security becuase now a days security is needed to every person and this is very important to implement security in our application so lets starts 
Follow these steps to create user based  adf Security in your application 

1)Create A  fusion adf  application
2)Click On adfc Config from the view Controller  --->WEB IN---->adfc-config-xml


3)from componenet pallet drag and drop four views with wild card
 a)first drop wild card 
 b)then drop four views name as shown in picture

4)Then choose control flow from the componenet pallet from wild card to all four view
as shown in picture


5)Name the all control flow and then click on overview tab of adf-confg page 
follwing data should be on your 


6)Now create a page template
                                                                                     
7)Name your Template as you wish after this click on template and choose


10)With the Facet Definitions tab in front, click add green plus icon to add a facet. Enter main_content in the Name field. Then click OK.


11)In the Component Palette, ADF Faces page, Layout panel, drag panel group layout icon 
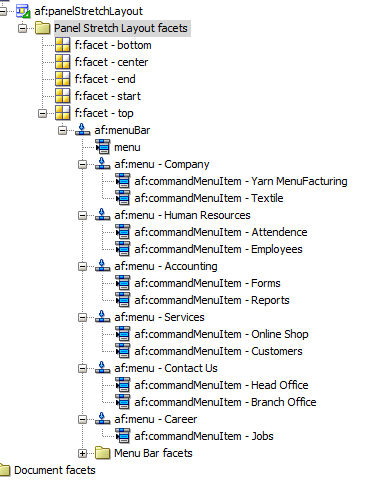
Panel Group Layout and drop it on the top facet of the template, in the visual editor.


12)In the Property Inspector, Common section, select vertical from the Layout dropdown list. Expand the Style section, select the Background tab, and select Black from the Background Color dropdown lis

13)In the Component Palette, Text and Selection panel, drag and drop out put texticon Output Text into the panel group layout you just added.

  1. In the Property Inspector, Common section, enter Product Information as the Value. Expand the Style section, select the Text tab, and select White from the Color dropdown list, medium from the Font Sizedropdown list, and bold from the Font Weight dropdown list.
  2. In the Component Palette, Layout panel, drag panel group layout icon Panel Group Layout and drop it on the start facet of the template.


your Template is ready to use  after this you should go to adfc-config page and then click on the login page as shown below
14)A login page.jsf will be craeted the choose your template according in this example i choose my template you will choose your template page
15)Design your login page according to your requiremnet e.g my design login page is that


16)After this you will craete all jsf pages (after double clicking on IT,Accnt,genral) according to your own reqiuremnt
now you have four jsf pages we have to implement security for these pages 
first of all implemnet security to your adf application
follow these steps
17)Choose your login page to click on form based authentication

now u can click finish
18)Now create users for your application for this purpose click on application and choose Test Users And roles Create users 
19)click on application roles and create roles according to your page e.g IT,Accnt,Genral
20)Click on IT and And then + tab to add users for IT
Repeate The Above steps To create Users For Other Department
21)Now Allocate Resources To Application Role for example Assign Accnt Department To the Accnt Page As you can see in the below example

Repeat the steps to manage Other Resources 
22)You have Successfuly implement Security To your Application for Your Resources
Now We have Add our Custom Login Class,because in this scenerio we have to condition based Login so add follwing code to your login Class


Now Your Application Is Ready To Use 
Hope You will Learn From my Efforts


Mushtaq Wattu(Alta UI Developer)

Bug in View Object Query in jdeveloper 12.2.1/Problem In Query Object Result

Helo every body Today i will discuss a bug in j developer version 12.2.1
Actually when you create a view Object you will face a error  when you ask the result from querry 
the querry does not return the result even if there is no error in querry syntax
i will discuss this by using pictorial view 
Lets Take an example of view object to Discuss This Bug

1)Click on View Object 


2)Then click On querry To check The Querry and Then click "Test and Explain"


3)Querry Will Execute But it Will Shows No Result Now Click on Edit Tab(pencil like tab with add tab)


4)You Will Noticed the querry will execute and return the result as you can show in the red error zone


5)Finally You Will get The Result


Follwing My vedio will clear all the Procedure and your bug will be adjusted


                                                           Thanx 
                                                   Mushtaq Wattu

Saturday, 25 June 2016

Showing Logged UserName by Using Security

helo Every one today i  will share how to show username of logged username by using adf security
this is quite simple to show the username of logged user.
actually the problem i am discussing with you is shown in this picture
you can see fahad is logged in this time so which is showing with name and icon
so to create this follow these simple steps
1)in your jsf page drop a output text and in the text portion write the follwing lines

         Welcome     #{securityContext.userName}
or you can also find this from using Expression builder


 so this is all for today  very simple and easy meathed to show the logged username
  if u have any confusin u can also follow this link
http://docs.oracle.com/cd/E18941_01/tutorials/jdtut_11r2_29/jdtut_11r2_29.html


Best regard
Muhammmad Wattu


Sunday, 19 June 2016

Advance ADF UI DVT Component With 3d Menubar

Today i will discus the updated and professional menues using css3 and adf faces componenet these menues have 3d look and they are retrieving from databases
 So i would believe that it will be Very Useful for U people
These are Three D menues and Having Unique Look
u can also see the use of dvt Component of adf
Steps To Create Home Page
1)I create a template Page
2)The menues are on the Template Page
3)create adf skins for whole page
4)define the designing of every componenet
like panel splitter,panel stretch layout,menubar etc
so the code for advance menu bar in adf skin is like that
af|menu::bar-item-open-icon-style {
    background-image: url("/images/select-arrow.png");
    height: 20px;
    width: 20px;
    padding-top: 2px;
}

af|menu::bar-item-text {
 
    font-size: 16px;
 font-family: Rambla ;
line-height: 1em;
color:white;
text-shadow:0px 0px 0 rgb(202,202,202),-1px 1px 0 rgb(158,158,158), -2px 2px 0 rgb(115,115,115),-3px 3px 2px rgba(0,0,0,0.6),-3px 3px 1px rgba(0,0,0,0.5),0px 0px 2px rgba(0,0,0,.2);}

}

af|menu::bar-item-text:hover {
    font-size: 17px;
 font-family: Rambla ;
line-height: 1em;
color:white;
text-shadow:0px 0px 0 rgb(202,202,202),-1px 1px 0 rgb(158,158,158), -2px 2px 0 rgb(115,115,115),-3px 3px 2px rgba(0,0,0,0.6),-3px 3px 1px rgba(0,0,0,0.5),0px 0px 2px rgba(0,0,0,.2);}
    -webkit-transition: all 2s;
    background-color:white;
}

af|menu::bar-item {
    padding: 0px;
    height: 25px;
}

af|menu::bar-item:highlighted {
    background-image: none;
    background: transparent;
    border: none;
    border-bottom: 2px solid #c00;
    padding: 0px;
}

af|menu::bar-item:depressed {
    background-image: none;
    background: transparent;
    border: none;
    border-bottom: 2px solid #c00;
        padding: 0px;
}

af|menu:highlighted af|menu::bar-item-open-icon-style {
    background-image: url("/images/select-arrow.png");
    padding-top: 2px;
}

af|menu:depressed af|menu::bar-item-open-icon-style {
    background-image: url("/images/select-arrow.png");
    padding-top: 2px;
}
af|menuBar
{
    overflow: visible !important;
    background: transparent;
    height: 25px;
}
af|commandMenuItem::menu-item-text {
   font-family: Rambla ;
line-height: 1em;
color:white;
    font-size: 14px;
text-shadow:0px 0px 0 rgb(202,202,202),-1px 1px 0 rgb(158,158,158),
-2px 2px 0 rgb(115,115,115),-3px 3px 2px rgba(0,0,0,0.6),-3px 3px 1px rgba(0,0,0,0.5),0px 0px 2px rgba(0,0,0,.2);
    height: 20px;
    width: 200px;
}
af|menu::child-container
{
    background-color: #006ba5;
    min-width: 150px;
    border-top: none;
}
af|commandMenuItem::menu-item-text:hover {

    background-color: #003152 !important;
}
af|commandMenuItem::menu-item-text:active {
     background-color: #006ba5;
}
af|commandMenuItem::menu-item-icon-style {
    display: none;
}

af|commandMenuItem::menu-item-open-indicator {
    display: none;
}

af|commandMenuItem::menu-item-accelerator {
    display: none;
}

next topic i will discuss how we can use adf faces component

Hope It will be very useful for Your Adf  Designing Phase
thanx
Mushtaq Wattu


Saturday, 11 June 2016

ALTA UI Menues

Helo every body How are you
I am sharing some adf knopwledge with you here are menues in alta 12.2.1
menues are simple and attractive in
the follwing steps are involved to create the menues in adf


1)first Of All create a Jsf page

2)Drag and drop panel stretch layout
3)In Top Facet Of panel stretch layout Drag and Drop menubar from component Pallet
4)Drag&Drop menues in menu bar
5)In menu Drop Command Menu Item
follwing Picture Will Show All the Data in jsf Page

6)Now create ADF skin and select The Faimly Alta   @charset "UTF-8";/**ADFFaces_Skin_File / DO NOT REMOVE**/@namespace af "http://xmlns.oracle.com/adf/faces/rich";@namespace dvt "http://xmlns.oracle.com/dss/adf/faces";af|menu::bar-item-open-icon-style {    background-image: url("/images/select-arrow.png");    height: 16px;    width: 16px;    padding-top: 2px;}
af|menu::bar-item-text {    color: #731800;    font-size: 16px;    font-family: openSans-Regular;    font-weight: bold; }
af|menu::bar-item-text:hover {    color: #eeaa00;    font-size: 14px;    font-family:verdana;}
af|menu::bar-item {    padding: 0px;    height: 25px;    font-size: 14px; }
af|menu::bar-item:highlighted {    background-image: none;    background: transparent;    border: none;    border-bottom: 2px solid #c00;    padding: 0px;}
af|menu::bar-item:depressed {    background-image: none;    background: transparent;    border: none;    border-bottom: 2px solid #c00;        padding: 0px;}
af|menu:highlighted af|menu::bar-item-open-icon-style {    background-image: url("/images/select-arrow.png");    padding-top: 2px;}
af|menu:depressed af|menu::bar-item-open-icon-style {    background-image: url("/images/select-arrow.png");    padding-top: 2px;}af|menuBar{    overflow: visible !important;    background: transparent;    height: 25px;}af|commandMenuItem::menu-item-text {    font-family: openSans-Regular;    font-size: 14px;    padding: 5px;    font-weight: 400;    color: #006394;    background-color: #f9f9fa;}af|menu::child-container{    background-color:#f9f9fa;    min-width: 100px;    border-top: none;}af|commandMenuItem::menu-item-text:hover {    background-color: #003152;     }af|commandMenuItem::menu-item-text:active {  background-color: #003152; !important;}af|commandMenuItem::menu-item-icon-style {    display: none;}
af|commandMenuItem::menu-item-open-indicator {    display: none;}
af|commandMenuItem::menu-item-accelerator {    display: none;
download Application Here Alta 12.2.1 Menues


Thanx
Mushtaq Wattu


Monday, 6 June 2016

Advanced 3D Animated Graph To show Progress


Hello Every Body
I am a fronT end Designer in Oracle ADF
I am sharing with u my knowledge of
HTML CSS JavaScript and librarirs of java script
The application I am sharing with you is bassically used to Visulaize Data
This is easy way To demonstrate Large Data In Summerize form
I am sure you will Get Benifit From This Data Year Wise

Muhammad Mushtaq
ADF UI  Developer
Here Is The Application

Thursday, 26 May 2016

3D Animated page In jsf


The page Will be Look This but when we move the mouse over the  page will be opened
Follwing are the meathed to Build up This page

1-create a login html page in jdveloper
2-write this code in the html page
<html>
  <head>
    <meta http-equiv="Content-Type" content="text/html; charset=UTF-8"/>
    <link rel="stylesheet" type="text/css" href="skins/Login.css">
      <link rel="stylesheet" href="//code.jquery.com/ui/1.11.4/themes/smoothness/jquery-ui.css">
  <script src="//code.jquery.com/jquery-1.10.2.js"></script>
  <script src="//code.jquery.com/ui/1.11.4/jquery-ui.js"></script>
  <link rel="stylesheet" href="/resources/demos/style.css">
    <script src="script/Login.js"></script>
    <title>Login</title>
    <style>
  .toggler { width: 500px; height: 200px !important;}
  #button { padding: .5em 1em; text-decoration: none; }
  #effect { width: 240px; height: 135px; padding: 0.4em; position: relative; }
  #effect h3 { margin: 0; padding: 0.4em; text-align: center; }
  </style>
  <script>
  $(function() {
    // run the currently selected effect
    function runEffect() {
      // get effect type from
      var selectedEffect = $( "#effectTypes" ).val();

      // most effect types need no options passed by default
      var options = {};
      // some effects have required parameters
      if ( selectedEffect === "scale" ) {
        options = { percent: 100 };
      } else if ( selectedEffect === "size" ) {
        options = { to: { width: 280, height: 185 } };
      }

      // run the effect
      $( "#effect" ).show( selectedEffect, options, 500, callback );
    };

    //callback function to bring a hidden box back
    function callback() {
      setTimeout(function() {
        $( "#effect:visible" ).removeAttr( "style" ).fadeOut();
      }, 1000 );
    };

    // set effect from select menu value
    $( "#button" ).click(function() {
      runEffect();
    });

    $( "#effect" ).hide();
  });
  </script>
  </head>
  <body style='background-image:url("loginbg.png"); background-repeat:no-repeat; background-size:100.0%;'>
    <div style="margin-left:1%; margin-top:1%;"><img src="resources/images/klashlog.png" width="301"></img></div>

<div class="login"
     style="background-color:#deeaf8;-webkit-box-shadow: 2px 0px 31px 3px rgba(230,205,205,1); -moz-box-shadow: 2px 0px 31px 3px rgba(230,205,205,1); box-shadow: 2px 0px 31px 3px rgba(230,205,205,1);">
<header class="header">
<span class="text">LOGIN</span>
    <span class="loader"></span>
  </header>
  <form class="form" method="POST" action="j_security_check">
            <input class="input" type="text" name="j_username" placeholder="UserName"
                   style="background-color:#deeaf8;"/>
            <input class ="input" type="password" name="j_password" placeholder="Password"
                   style="background-color:#deeaf8;"/>
           <button class="btn" type="submit" style=" background-color:#deeaf8;"></button>
      </form>
    </div>
 
    <button class ="resetbtn" type= "reset"> Reset it </button>
   <div class="Help"
        style="margin-left:70%">
 
   <div class="toggler">
  <div id="effect" class="ui-widget-content ui-corner-all">
    <h3 class="ui-widget-header ui-corner-all">Help</h3>
    <p style="background-color:#d5efff;">
      If you are enable to login into your account then you can recheck your account and try again!!!!!
    </p>
  </div>
</div>
 <select name="effects" id="effectTypes">
  <option value="blind">Blind</option>
  <option value="bounce">Bounce</option>
  <option value="clip">Clip</option>
  <option value="drop">Drop</option>
  <option value="explode">Explode</option>
  <option value="fold">Fold</option>
  <option value="highlight">Highlight</option>
  <option value="puff">Puff</option>
  <option value="pulsate">Pulsate</option>
  <option value="scale">Scale</option>
  <option value="shake">Shake</option>
  <option value="size">Size</option>
  <option value="slide">Slide</option>
</select>

<button id="button" class="ui-state-default ui-corner-all">Need Help</button>
 
   </div>
  </body>
</html>

3-Add These Libarries and css code For page Animation
4 Css For Animation
@import url(http://fonts.googleapis.com/css?family=Lobster);

* {
  margin: 0;
  padding: 0;
  -moz-box-sizing: border-box;
  box-sizing: border-box;
  user-select:none;
}

body {
  background: hsla(255, 255%, 255%, 1);
  }
.icon {
            margin-top: 10px;
    padding-left: 1200px;
    padding-right: 30px;
}
.login {
  position: absolute;
  top: 50%;
  left: 50%;
  margin: -10rem 0 0 -10rem;
  width: 20rem;
  height: 20rem;
  padding: 3em;
  background: hsla(255,255%,255%,1);
  border-radius: 50%;
  overflow: hidden;
  transition:all 1s ease;
    font-family: monospace;

}
.login:hover > .header, .login.clicked > .header {
  width: 2rem;
}
.login:hover > .header > .text, .login.clicked > .header > .text {
  font-size: 1rem;
  -webkit-transform: rotate(-90deg);
  transform: rotate(+90deg);
}
.login.loading > .header {
  width: 20rem;
  transition:all 1s ease;
}
.login.loading > .header > .text {
  display: none;
}
.login.loading > .header > .loader {
  display: block;
}
.header {
  position: absolute;
  left: 0;
  top: 0;
  z-index: 1;
  width:20rem;
  height: 20rem;
  background: hsla(0, 5%, 0%, 1);
  transition: width 2s ease-out ;
    background-color: #006ba5;
}
.header > .text {
  display: block;
  width: 100%;
  height: 100%;
  font-size: 5rem;
  text-align: center;
  line-height: 20rem;
  color: hsla(255,255%,255%,1);
  transition: all 1s ease-in-out;
}
.header > .loader {
  display: none;
  position: absolute;
  left: 5rem;
  top: 5rem;
  width: 10rem;
  height: 10rem;
  border-left: 10px solid hsla(255, 255%, 255%, 1);
  border-bottom:10px solid hsla(255,255%,255%,1);
  border-right:10px solid hsla(255,255%,255%,1);
  border-top: 8px solid hsla(255,255%,255%,1);
  border-radius: 50%;
  box-shadow:inset 2px 2px 2px 2px hsla(0, 5%, 0%, 1);
  animation: loading 3s linear infinite;

}
.header > .loader:after {
  content: "";
  position: absolute;
  left: 4.15rem;
  top: -0.5rem;
  width: 1rem;
  height: 1rem;
  background: hsla(1, 75%, 55%, 1);
  border-radius: 50%;
  border-right: 1px solid hsla(1, 75%, 55%, 1);


}
.header > .loader:before {
  content: "";
  position: absolute;
  left: 3.4rem;
  top: -0.5rem;
  width: 0;
  height: 0;
  border-right: 1rem solid hsla(1, 75%, 55%, 1);
  border-top: 0.5rem solid transparent;
  border-bottom: 0.5rem solid transparent;
}

@keyframes loading {
  50% {
  border-left: 10px solid hsla(1, 95%, 25%, 1);
  border-bottom:10px solid hsla(1, 95%, 25%, 1);
  border-right:10px solid hsla(1, 95%, 25%, 1);
  border-top:8px solid hsla(1, 95%, 25%, 1);
  }

  100% {
    transform: rotate(360deg);
  }
}
.form {
  margin: 0 0 0 2rem;
  padding: 0.5rem;
}

.input {
  display: block;
  width: 100%;
  font-size: 1.5rem;
  padding: 0.5rem 1rem;
  box-shadow: none;
  border-color: hsla(0, 5%, 0%, 1);
  border-width: 0 0 3px 0;
  transition: all .99s ease-in;
  outline:transparent;
}
.input + .input {
  margin: 15px 0 0;
}
.input:focus {
  border-bottom: 3px solid hsla(1, 75%, 55%, 1);
}

.btn {
  position: absolute;
  right: 7rem;
  bottom: 5rem;
  width: 4rem;
  height: 4rem;
  border: none;
  background: hsla(255, 255%, 255%, 1);
  font-size: 0;
  border: none;
  transition: all 0.99s ease-in-out;
    color: #006394;
}
.btn:after {
  content: "";
  position: absolute;
  left: 1.4rem;
  top: 1rem;
  width: 0;
  height: 0;
  border-left: 1.6rem solid hsla(1, 75%, 55%, 1);
  border-top: .8rem solid transparent;
  border-bottom: .8rem solid transparent;
  transition: border 0.3s ease-in-out 2s;
}
.btn:hover, .btn:focus, .btn:active {
  outline: none;

}
.btn:hover:after, .btn:focus:after, .btn:active:after {
  border-left-color: hsla(0, 5%, 0%, 1);
}
.resetbtn{
    border:none;
  padding:.5em;
  width:5em;
  background:hsla(0,0%,0%,1);
  color:hsla(255,255%,255%,1);
  font-size: 1em;
  border-radius:2px;
  transition:all 1s ease-in-out;
  outline:none;
  box-shadow:0 0 1px 1px hsla(0,0%,0%,0.2);
    background-color: #006ba5;
    margin-left: 60%;
    margin-top: 30%;
    margin-bottom: 0px;
    margin-right: 0px;
    padding-left: 0px;
            }
.resetbtn:hover, .resetbtn:focus{
  background:hsla(255,255%,255%,1);
  color:hsla(0,0%,0%,1);
      background-color: #d6e7ff;
    outline-color: #0084c6;
}
5    JS For This page
$(document).ready(function() {
  $('.input').on('focus', function() {
    $('.login').addClass('clicked');
  });
  $('.login').on('submit', function(e) {
    e.preventDefault();
    $('.login').removeClass('clicked').addClass('loading');
  });
  $('.resetbtn').on('click', function(e){
      e.preventDefault();
    $('.login').removeClass('loading');
  });
})

6   Do not Forget To add These Libraries of javascript


    <link rel="stylesheet" href="//code.jquery.com/ui/1.11.4/themes/smoothness/jquery-ui.css">
  <script src="//code.jquery.com/jquery-1.10.2.js"></script>
  <script src="//code.jquery.com/ui/1.11.4/jquery-ui.js"></script>

Run Your Login page

your login page is ready to use


Thanx
Mushtaq Wattu